Monday, November 12, 2018

Gown Photo Shoot

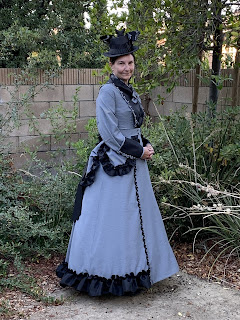
I got my dress photos this weekend (thank you, boyfriend). I regretfully didn't do a final check before heading to the camera, so the back is bunched at the waistband and the neckline doesn't look smooth in the front, sigh. 

I am wearing the bat hat that goes with my Bat dress, but it's the only black Victorian hat that I own! Fiona was quite fascinated by the bat hat.


In my undies! I had an existing chemist, corset, and petticoat. The corset is 1890s and not 1860s but I didn't want to make a new one and figured it's close enough.


And here are all the beautiful outdoor pictures in the gown! I am really happy with how this project turned out. It was a lot of work, but worth it. And I think I can wear it for the mourning tea at CoCo next year!


Monday, November 5, 2018

1869 Gown is FINISHED!


I finished the gown this weekend! Hallelujah!

First I had to do the collar. This required cutting individual scallops, attaching them to the neckline, then binding. There was no seam allowance given on the curved edges. I also couldn't figure out how to sew them on and then bind them. So I ended up cutting individual scallops and binding those, much less painful. I think I should have left off the seam allowance that I added, I forgot the binding would go around the raw edge and I didn't need it, but hey, bigger scallops = less binding to do. I then used a strip of binding to attach all the scallops together. They are supposed to go like this:


I wasn't wild about that look and tried on the outside too, but in the end decided to go with the pattern suggestion of inside scallops. I also didn't like the black bow against all that black, so I made a plaid bow.


Here's the back with the bow pinned on. I was supposed to bind the long tails also, but honestly, couldn't bear the thought of binding more scallops. So I got out my gum arabic and sealed the taffeta and used my scallop scissors to cut it. I also decided I needed a bigger bow after looking at this picture.


I had also forgotten to make the waistband of the basque larger since it's the final layer of the gown, and had this small gap in the front. I decided to make a waistband extension rather than removing and replacing the waistband. I also put a couple of covered buttons on each side and used a hook and bar closure for it.


And voila, here is the finished gown, complete with matching cat tail! Bobo for some reason has been obsessed with this particular gown, from fabric cutting to completion.


The plaid bow looks so much better, and I put a button in the center. I ended up tapering the scalloped collar down towards the center front so there wouldn't be giant scallops overlapping.


I thought the back bow was too small, so added a second larger bow behind it, and it looks perfect!


And finally a picture of the back with the tail on the correct side of the gown!


Pictures of me wearing it coming this weekend!

Monday, October 22, 2018

Bodice is almost done

After many hours of hand sewing binding, the revers are now on the bodice. I also tried it on over the corset and it fits perfectly! Now I have to sew on 42 buttons and do the hook and eye closure on the front.


I also need to do the collar. It is supposed to have individually cut scallops sewn on and bias bound. What you see in the picture is just a scalloped piece I cut for the sash that is draped in there. I am soooooo tired of hand binding scallops - I estimate I've spent about 20 hours hand sewing between the skirt and the bodice. I am definitely not doing the individual scallops, the thought of that makes me cry, so I think I am going to either use one of the sash pieces or cut a new scalloped piece. The sashes are supposed to be bias bound also, but instead I am going to do them in the black taffeta and use my scalloped scissors because I AM SICK OF BINDING SCALLOPS.

Monday, October 15, 2018

1869 Bodice

I made good progress on my 1869 bodice this weekend. I got the new back fitting nicely, although when I put it on me it's a tiny bit tight in the upper shoulders so I will let out the darts some.

Here's the bodice with the revers clipped on just so I can get an idea of how it will look. Excuse the dark photos, the light isn't the best in the evening in my sewing room.


Then I did the sleeves. I had to bias bind the scallops on the sleeve revers, but thankfully only 5 scallops so it didn't take as long. The plaid fabric made nice binding and I was able to successfully use my little binding gadget at the iron to make perfect binding! I think it's supposed to be a bit thinner but I wanted to match the pre-bought black binding I used on the skirt.


The sleeves look so good! Of course once I sewed them into the bodice, I realized that I put the left sleeve rever on in the wrong spot - it was offset by 180 degrees, so the buttons were at the wrong seam. So, I cursed a bit, then took off the buttons and binding and redid it. Also there was supposed to be an "O" marked on the bodice armscye to line up the sleeve and that was not there. Luckily I was able to use a marked number to get it set correctly.

Next up is to bias bind the revers for the bodice. Ugh. But it's worth it, right?

Monday, October 8, 2018

1869 Skirt Progress

Last weekend I did the basque for my gown, because my seam binding somehow got lost in the mail (thank you Amazon for believing me and giving me a credit) so I couldn't work on the skirt until it came.

I used some old red lining I had laying around for the basque. The directions didn't say to line it but I decided to anyhow. Those ruffles took forever! I started pressing them to hem, then decided it would be really nice to use my scalloped scissors to mirror all the other scallops on the gown. But I remembered that taffeta will fray like crazy, so got out the gum arabic I bought and mixed some up and painted it on the strips before cutting them. And it worked! The edges seem nice and crisp and so far no fraying. I tried not to handle them much when running them through the machine. It came out a tad too small, I forgot this was a 28" finished waist gown and this is the last layer, so I need to do something. I might add a strip and put buttons on each side, or just make buttonholes and button it onto the skirt waistband. And there's a small chance it will just fit after I'm dressed and corseted.


I was hoping to find something in stash to flatline the skirt, but didn't have enough of anything, so I ordered some silk organza. I had trouble with the skirt directions - there were supposed to be pockets between the front and side front seams, but that is impossible given that the front edge is scalloped. I think that there were originally two views for the pattern, one without scallops. I decided just to leave off the pockets. I could put them in the side seams but haven't decided yet if I want to undo the seams. I also found the back to side front seam didn't line up right, although it looks okay on the pattern, so maybe the fabric stretched a bit when I serged the flatlining on. I just trimmed it to fit. It took me 4 hours per side to bias bind the scallops on the front by hand. I figured I would have better control getting around all those curved and pointed edges. 

I had some helpers making sure my skirt pieces didn't blow away.


Pinned onto the dress form - the scallops weren't pressed yet and look terrible here!


It looks MUCH better with the scallops pressed! I got all the buttons on the left side and 8 on the right side before my hands gave out. The skirt pieces are only attached via the buttons. I also got the ruffle on the skirt, using the same method of gum arabic treatment and scalloped scissor edges. It looks so much better in person, for some reason it's hard to photograph. I had some cat "assistance" pinning on the ruffle, Fiona and Bobo both insisted on being under Petunia while I was doing it, and Fiona kept attacking my hands each time I tried to place a pin!


So all that is left is the remaining 18 buttons on the right front, and a waistband. I may just bias bind the upper edge since the basque will be over it, but haven't decided yet.

Monday, September 24, 2018

Ugh ... that bodice!

I love that EvaDress reproduction patterns exist, but have also found that they do not always fit very well and are not always drafted well. I worked on the mock-up of the 1869 bodice this weekend and found this to be very true! 

I had some kitty helpers when I was cutting the pattern! I have found that giving them the pattern scraps when I am cutting helps to keep them occupied.


First attempt. The darts looked way too far away from CF to me (and confirmed that with my wonderful bustle dress gals). The darts were also super skinny and very low, well below the point of the bust. In this image I had them pinned in the marked locations but raised the tops to the bust.


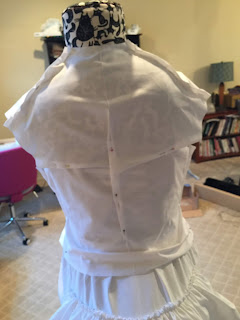
The back also looked really awful and clearly isn't meant to be worn over a bustle. The bodice looks worn tucked into the skirts in the images, but it's hard to tell. I also have never made a bodice that didn't have side back seams. The wonderful Jennifer from Historical Sewing told me they often had "mock" side back seams in 1860s bodices and side back seams were used for fitting later in the 1870s and 1880s.


Here is round two - much better! I kept one dart where it was and moved the outer one closer to the CF. 


For the back, I pinned in some mock side back seams. Jennifer also suggested that I slash up to the waist so the back can spread over the bustle. I will add in fabric to those areas to keep the option open of wearing it on the outside of a skirt over the bustle.


My fabric is due to arrive tomorrow or Wednesday (I am NEVER ordering from Fabric Fashion Club again - they took 9 days just to ship my order then another week of transit time, grrr.....).

I can already tell that bias binding all the scallops is going to be a MAJOR headache, and I think I will have to do it entirely by hand so it will look nice. Sigh. Good thing I have my Lifetime movies for hand sewing! I noticed the pattern instructions say to use contrasting bias, so I think I will use my check fabric for binding on the revers, and black binding on the check skirt scallops.

Monday, September 17, 2018

TV108 Grand Bustle

For my 1869 dress I needed a new bustle because it's an earlier time period than my imperial tournure. The TV108 Grand Bustle says suitable for 1869 to 1875, and it has the shape I want for the gown.

I made it from white kona cotton and used my trusty roll of twill tape for the bone casings. It took a very long time to press, hem, gather, and pin all the ruffles, but it's so floofy and worth it!


I still need to tack down the waistband and finish closing the casings now that the bones are inserted, plus put on a closure. The only problem I had with it is that my bottom ruffle extended into the lower bone casing. I think it's because I didn't hem the upper edges of my ruffles since they're not visible, so each ruffle was a bit longer than it should have been. I ended up cutting that bottom ruffle at the side seam and hemming it so that I could sew on the final casing. I bought the pre-made pack of boning from TV which was awesome because there's a lot of boning there and they were already cut to length and tipped.

The giant R2-D2 post

I've been bad about updating on my latest project - a Victorian R2-D2 gown! I have a whole group for Costume College who also want to cr...